PrevNew rich text editor for ProcessWire
This week we take a look at a new rich text editor for ProcessWire, why we chose it, some highlights, screenshots, and why we think you’ll like it. More
The TinyMCE 6 rich text editor opens up a lot of new and useful abilities for ProcessWire users. In this post, we'll take a look at a few of them, and how you can start using them now, with a focus on those that are unique to ProcessWire's implementation of TinyMCE.
There's a lot here, and there's also a lot more to cover! But the reality is, TinyMCE is easy to use, largely self-explanatory, and has excellent documentation. So this post focuses in on a few specific aspects that may not be as obvious or that won't be found in TinyMCE outside of ProcessWire. Essentially, this post covers several topics that I think web developers will find useful in configuring and implementing TinyMCE in ProcessWire.
Note that as of ProcessWire 3.0.226 (August 2023) TinyMCE is now part of the core and can be installed in the admin from Modules > Install > InputfieldTinyMCE.
Many reading this are likely already familiar with CKEditor 4, which has been used as ProcessWire’s rich text editor throughout most of the 2.x and 3.x versions. TinyMCE 6 produces compatible markup with CKEditor 4, making it easy to switch from CKEditor to TinyMCE in ProcessWire. But our TinyMCE version offers a lot of new features that you didn't have in CKEditor, providing you a broader range of customization options and tools, and in many cases, making it a lot simpler to achieve a particular result.
Sometime in early 2023 the InputfieldTinyMCE module will be added to the ProcessWire core (in the admin at Modules > Core > Inputfield > TinyMCE). Prior to its inclusion in the core, you can get it from our modules directory here. Currently, InputfieldTinyMCE requires ProcessWire core version 3.0.200 or newer.
In ProcessWire, you don't create a TinyMCE (or CKEditor) field directly. Instead, you create a Textarea field, and then on the Details tab, you choose TinyMCE for the Inputfield type.
Converting an existing field to use TinyMCE is equally easy. Let's say you already have a field named body that currently uses CKEditor. Edit that field (Setup > Fields > Body), click the Details tab, and then change the Inputfield type selection from CKEditor to TinyMCE. Save.
Whether you created a new Textarea field or converted an existing CKEditor field, the settings for configuring TinyMCE will appear on the Input tab when editing the field. The default settings are a good recommended starting point and provide an editor that balances useful editing tools with a safe environment. By safe, I mean an environment where the user is working largely with semantic markup, and not custom font sizes, colors, etc.
Though should you want the user choosing fonts, sizes and colors, TinyMCE certainly supports it. But most reading this will prefer to keep the user focused on semantic content over style, and let styling aspects be handled by the site's style sheets. In doing this, the content stays consistent and portable, able to adapt to different usages, future redesigns, and so on.
ProcessWire Textarea fields using TinyMCE can also be used within any of these other types of fields:
TinyMCE is now also available as a supported input type for the following ProFields modules (versions from December 2022 and newer):
To use TinyMCE with any of the above field types, simply install the InputfieldTinyMCE module (if not already available in your core version) and you will see it available in the column/subfield/input Type selection for any of the above field types.
InputfieldTinyMCE has two configuration screens: one for the module, and another for each field using TinyMCE. There are several settings that can be configured either with the module, or separately for each TinyMCE field.
The benefit of configuring a setting with the module is that you can very easily make adjustments to all TinyMCE fields at once, saving you time. The drawback is that you lose the interactive ability to fine tune some settings individually for each field. (Though the Custom JSON settings option provides a way around that).
Whether you want your settings to be configured globally for all TinyMCE fields at once (with the module) or you want them to be configured per-field, that is a decision you can make on the InputfieldTinyMCE module screen:
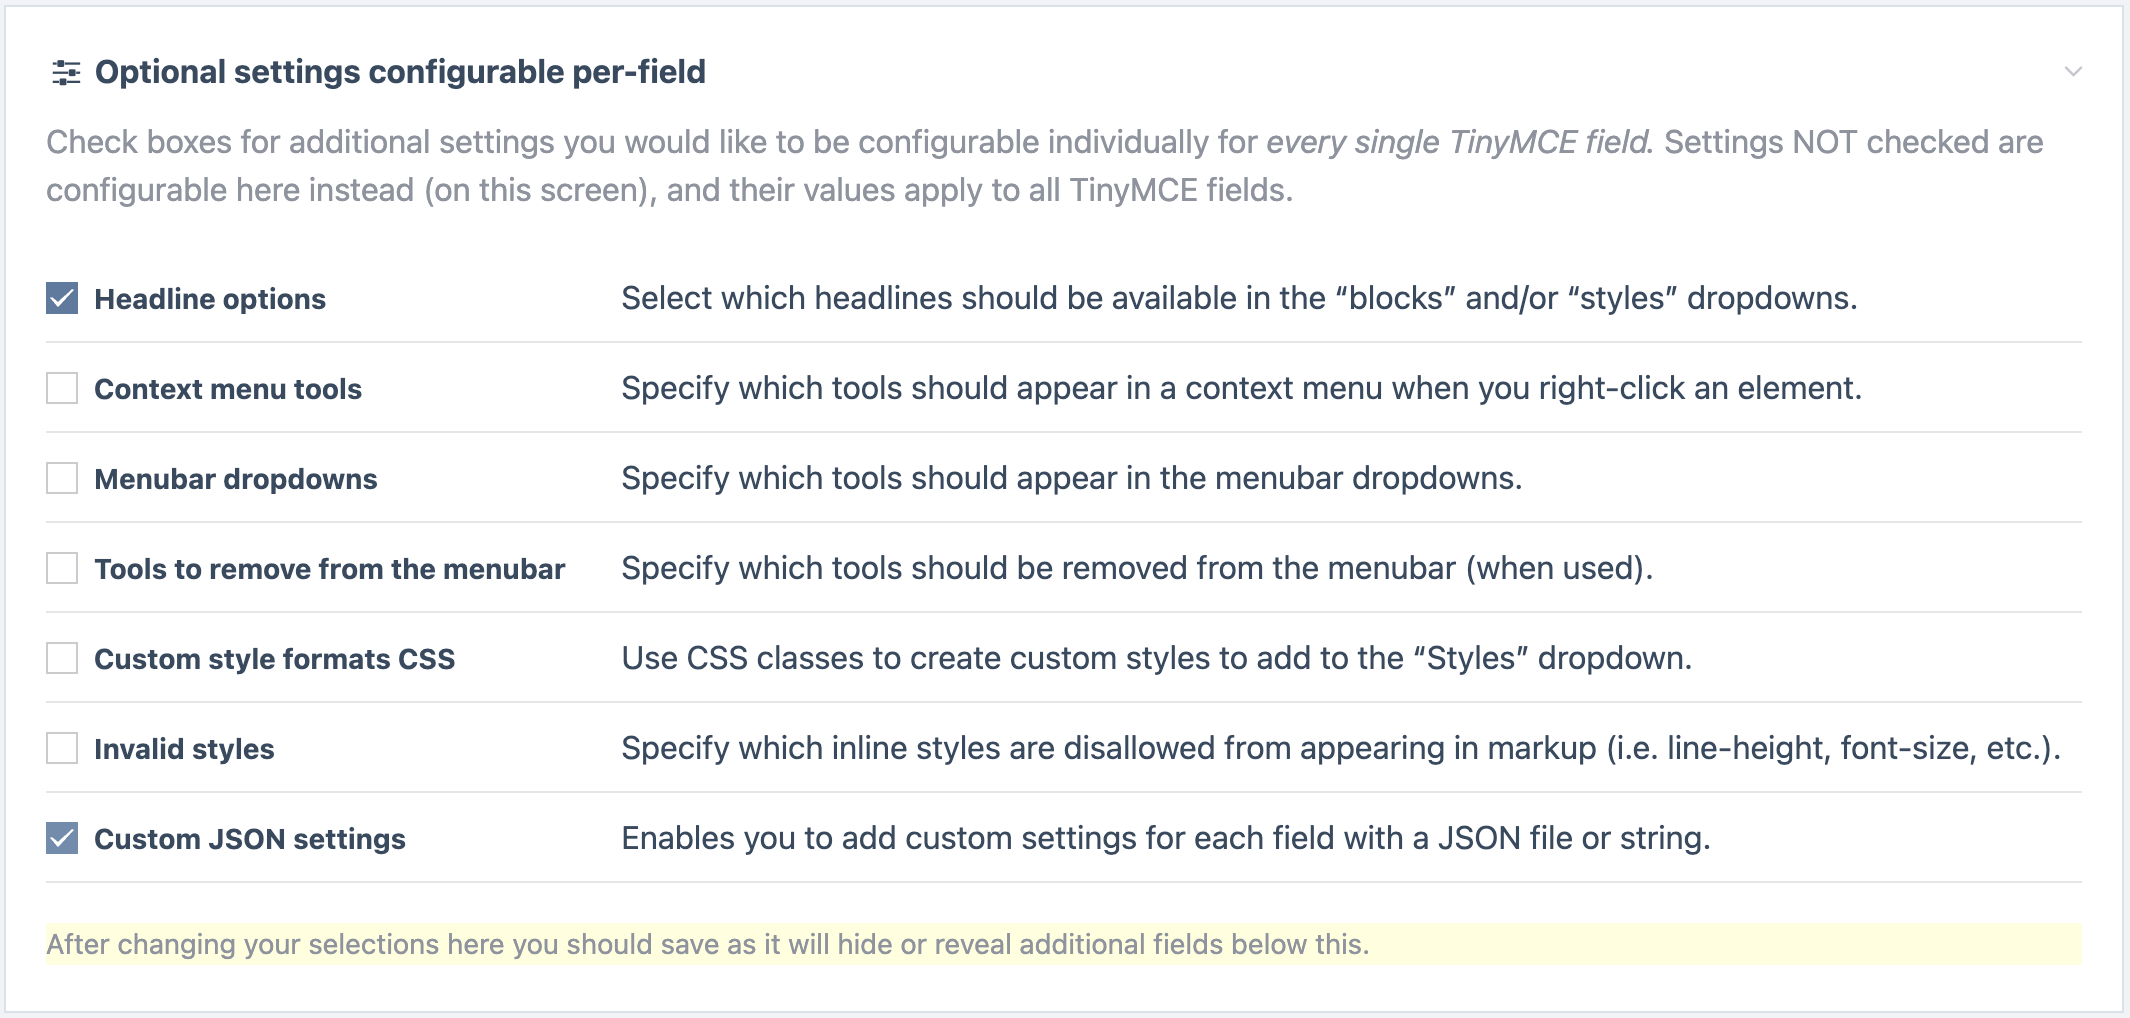
My advice is to leave all the boxes unchecked except for the last one (Custom JSON settings). This leaves the settings configurable with the module, affecting all fields at once. You can always come back and make settings configurable for each field when/if you find you need to. TinyMCE has a lot of configurable field settings either way, so the more settings you can re-use (by configuring with the module) the simpler each field configuration will be.
That last setting I mentioned, "Custom JSON settings" leaves the back-door open to customizing anything you want at the per-field level. It can be useful in cases where you might need something specific for one field or another. That's why I mentioned checking the box for that option, and we'll discuss that option further in this post.
In ProcessWire, you might have several rich text editors appearing in the page editor at the same time. It's not inexpensive (time wise) to initialize each TinyMCE editor, so the ideal situation is to initialize only the editors that we will be using during an edit session, via lazy loading.
Lazy loading is something that we support with CKEditor too, though only when the CKEditor inline mode was used. With TinyMCE, we support lazy loading in both the Normal editor and the Inline editor. Lazy loading is not specifically a feature of TinyMCE (or CKEditor), but rather is something we've coded into InputfieldTinyMCE for ProcessWire.
When using the TinyMCE inline editor mode, lazy loading is always enabled. When you hover (or tap) on the inline editor, it initializes automatically. This is essentially the same way that we did it with CKEditor (inline mode).
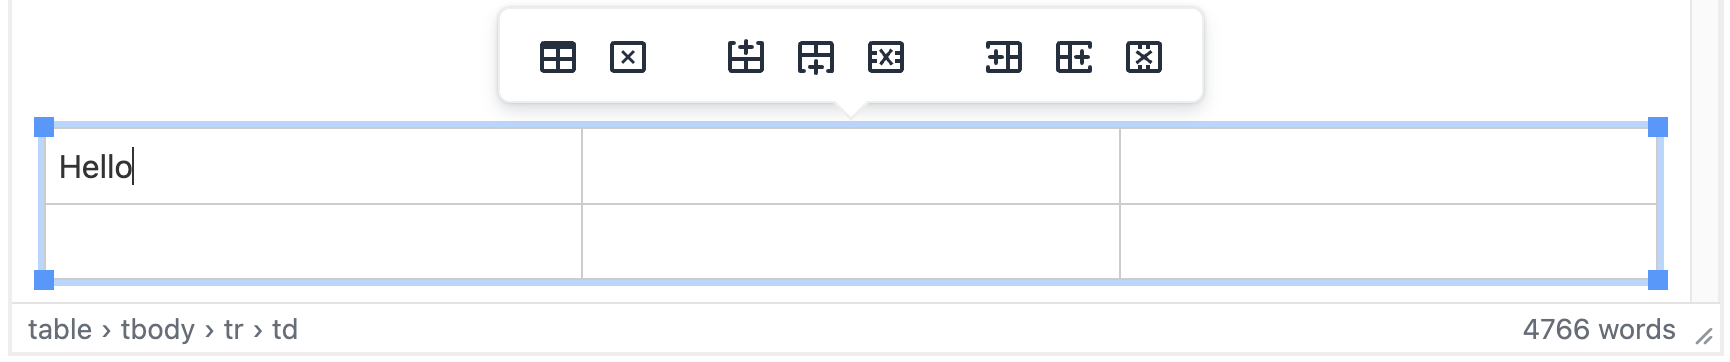
The drawback with Inline mode (whether TinyMCE or CKEditor) is that there is no status bar at the bottom with the handy element path selection tool. For that reason, I often prefer to use the Normal editing mode… I find that status bar pretty convenient, as you can click any element in the element path (lower left) to select it, something that can be otherwise hard to do.
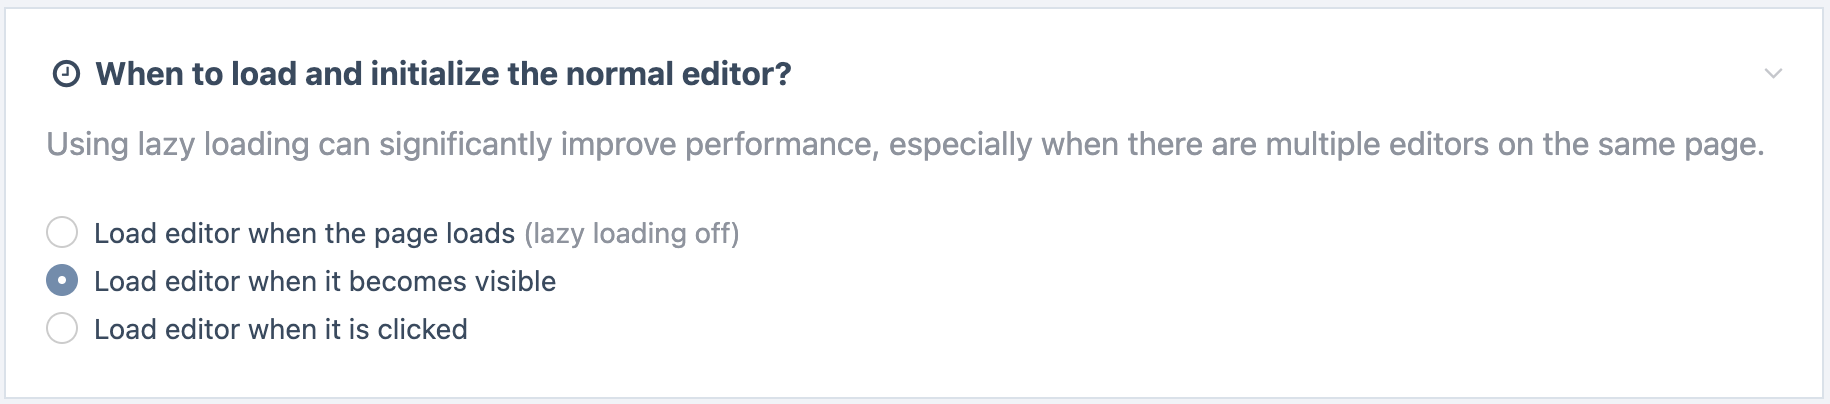
With InputfieldTinyMCE (and unlike CKEditor) we also support lazy loading for this Normal editing mode, giving it similar performance benefits to Inline mode. Two different lazy loading options are supported for Normal editor mode:
This is the default option and what I recommend to start. When selected, any visible editors on the current page editor tab are initialized at the same time as the rest of the page. Editors hidden behind top-level tabs or collapsed fieldsets are not initialized until they become visible. Performance wise, this is a major improvement over no lazy loading, but not as fast as waiting until the user interacts with the field. It's a good middle ground that balances performance with convenience.
This is a much more aggressive lazy loading option that provides the best performance, similar to (or maybe even better than) inline editors. Though there are two minor drawbacks. The first is that an interaction (whether click or touch) inside the editor content is required before it is initialized. Meaning you have to click the editor to say "I want to edit this", which is an extra step relative to other editing modes. The other minor drawback is that the editor toolbar/menubar does not become visible until the editor is initialized. Since the Normal editor toolbar/menubar remains visible (unlike Inline mode), that means an initialized editor consumes a little more vertical space than a non-initialized editor, visibly moving the content below the editor down by 40 pixels or so when you click to initialize it. Likely a non-issue, but worth mentioning still.
When lazy loading is off, this is essentially the same as a normal CKEditor, which also initialized with the page editor load. This is a good way to go if you only have 1 or 2 TinyMCE instances needed in the page editor. Though in most cases it will likely be visually indistinguishable from the first lazy load option, and that's why we've enabled the first lazy loading option by default.
The Styles dropdown is typically the first tool in the toolbar and the place where you can select among different headlines, inline and block styles to apply. It can also help with identification of the current element. A feature unique to InputfieldTinyMCE is the ability to customize this Styles dropdown by using simple CSS rules in module (or field) configuration.
If you ever customized the CKEditor formats dropdown, this is essentially the same thing, but a whole lot simpler to customize in TinyMCE. With CKEditor, you had to maintain separate mystyles.js and content.css files in order to customize the formats. It was enough of a pain that I rarely bothered to implement custom formats with CKEditor. With our implementation of TinyMCE, now the opposite is true.
We wanted our implementation of styles/formats customization with TinyMCE to be so easy that we'd use it all the time, with no technical requirements other than knowing a little CSS. TinyMCE doesn't actually consume these rules as CSS, but I thought it was the simplest means of defining custom styles/formats since we [web developers] all already know how to use CSS. Behind the scenes, InputfieldTinyMCE converts the CSS rules to TinyMCE JSON configuration rules. But knowing that is not important.
The TinyMCE Styles dropdown comes with these groups of items by default
Within each of those groups are selectable styles/formats. For instance, within Headings is H1, H2, H3, etc. and within Inline is Bold, Italic, Underline, Strikethrough, etc.
Let's say that we want to add a "Outline paragraph" format in our Blocks group. To do that, we'd specify a CSS style like this:
#Blocks p.outline { padding:20px; border:1px dotted #ccc; } /* Outline paragraph */Or if you prefer, you can use a multi-line style:
#Blocks p.outline {
  /* Outline paragraph */
  padding: 20px;
  border: 1px dotted #ccc;
}
What we are saying with this rule is that we want to add an "Outline paragraph" style in the Blocks dropdown group, and we want to present it in the editor with some padding and a dotted border.
Note that the text in the /* CSS comment */ defines the label that is used in the dropdown. If you don't specify this label, it'll use the CSS selector as the label instead, i.e. p.outline.
The styles that we define here only affect the appearance in the editor. So there's an assumption that you'll also add your own p.outline style in your site's CSS to style the <p class="outline">...</p> elements.
Not a best practice, but if we wanted to inline the styles with the element, creating a <p class="outline" style="..."> element instead, you can do that by typing the CSS property names in uppercase:
#Blocks p.outline { PADDING: 20px; BORDER: 1px dotted #ccc; } /* Outline paragraph */Our example above added an item to the existing #Blocks group. But perhaps we want to add our own group called Extras. To do that, we'd use #Extras at the beginning rather than #Blocks:
#Extras p.outline { … }Let's say that we want to remove the Align group entirely. We can do that like this:
#Align { display: none }Or perhaps we want to remove an item within an existing group. For example, let's say we want to remove Heading 1 from the #Headings group and remove Center from the #Align group, here's how we can do that:
#Headings (Heading 1) { display: none }
#Align (Center) { display:none }If you want to add a style/format to the root of the Styles dropdown (rather than within a group), no problem. Just specify the CSS rule without a #Group, like this:
span.alert { color: red; } /* Alert Text */If you just want to add an element to the styles/formats, but don't want to specify any CSS rules for it, that's fine too (some elements already come with their own styling and maybe don't need anything further):
#Inline ins {} /* Insert text */
#Inline del {} /* Delete text */In the example below we are adding a Uikit group to the Styles dropdown and making it possible for the user to select among a few Uikit text styles:
#Uikit .uk-text-lead { font-size: 1.5em } /* Lead text */
#Uikit .uk-text-meta { font-size: 14px; color: #999 } /* Meta text */
#Uikit span.uk-text-primary { color: blue } /* Primary text */
#Uikit span.uk-text-danger { color: red } /* Danger text */
Note how in the first two rules we are just specifying the .class while in the second two rules we are specifying the element span and class, i.e. span.class. What's the difference?
When you specify just a class, like #Uikit .uk-text-lead then selecting that style will add the class to whatever element the cursor (or selection) happens to be in. So if my cursor is within a <p> then it'll covert it to a <p class="uk-text-lead">. Or if my cursor is within a <strong> then it'll convert it to a <strong class="uk-text-lead">.
When you specify both an element and class, like #Uikit span.uk-text-primary then it will insert a <span class="uk-text-primary"> to wrap the selected text. If there is no selected text, then it'll wrap whatever word is under the cursor with that span.
To summarize:
element.class if you want it to insert that element with the class..class if you want it to add the class to whatever is the selected/current element.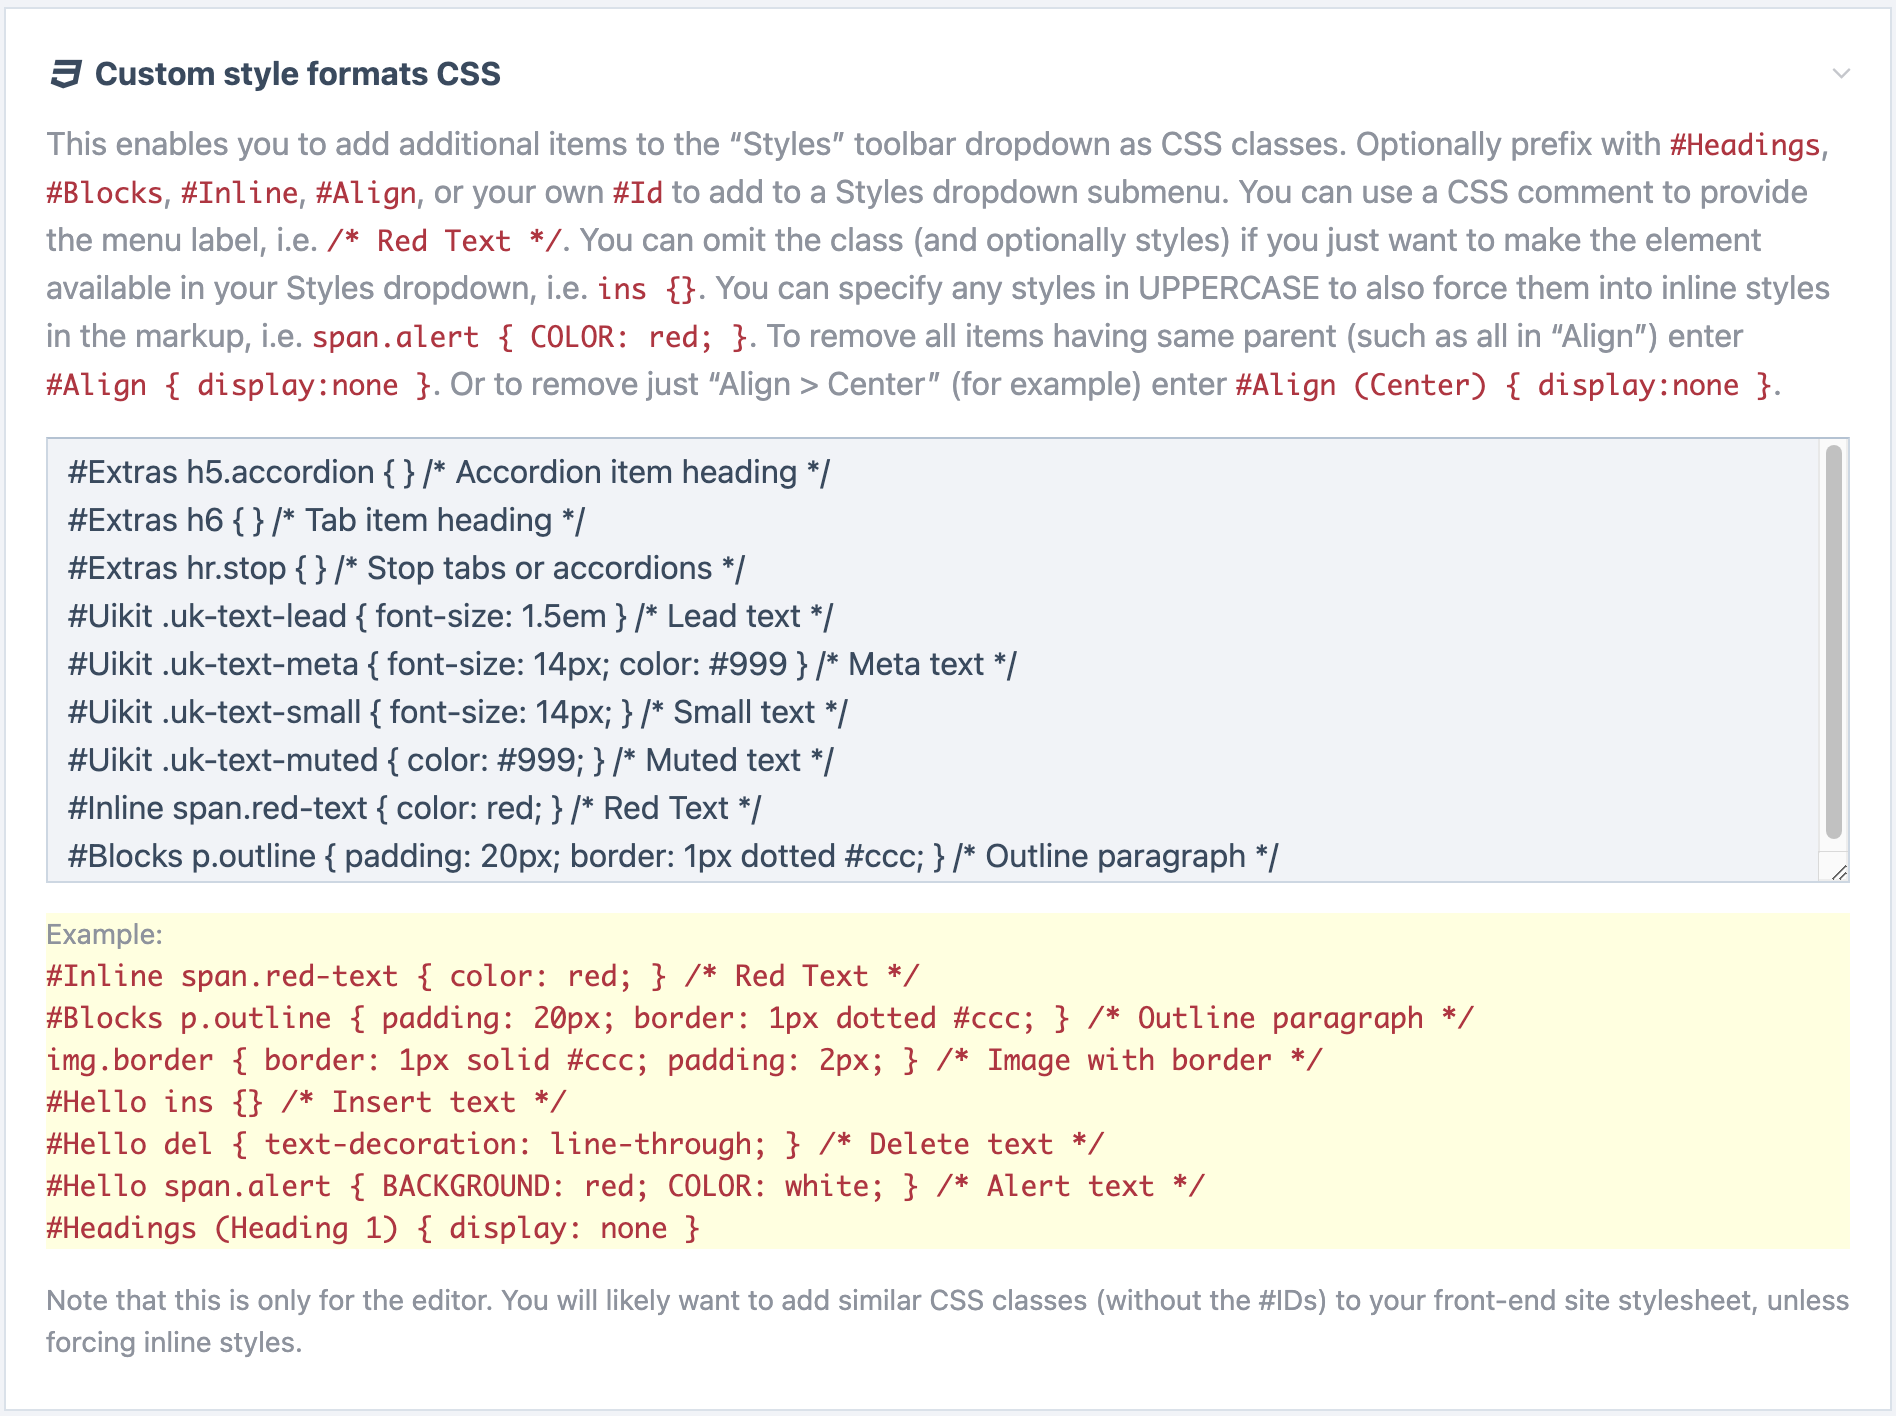
In the previous section we customized the Styles dropdown, and in doing so, also added some custom styles to the editor. What if we wanted to customize the content appearance in the editor, but without adding new items to the Styles dropdown?
To accomplish this, we could certainly make TinyMCE use our own custom content.css file (in the module settings), but that would define all the editor styles, rather than just our custom ones… so it seems like overkill. What if we just want to add on a few additional custom styles, without redefining everything?
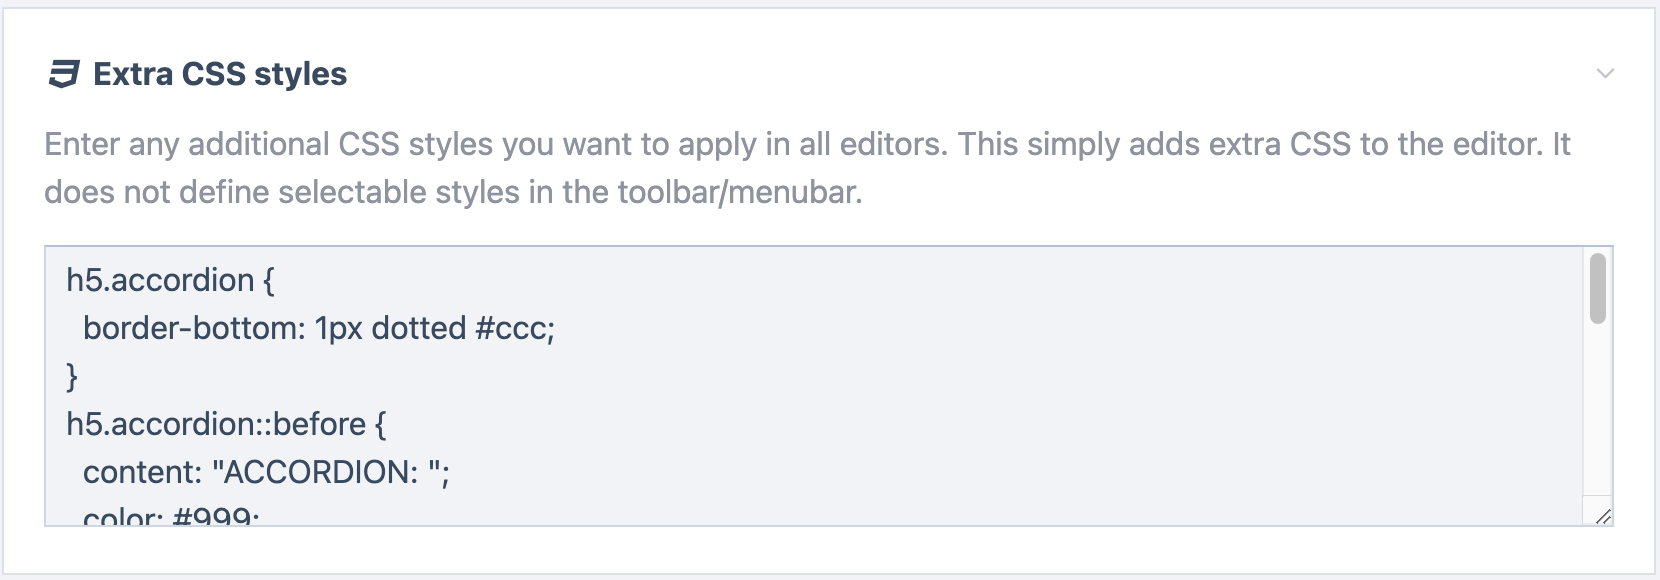
This is where the Extra CSS styles setting in the InputfieldTinyMCE module configuration comes into play. It lets us add extra CSS rules that apply to all of our editor instances.
Let's get into an example. But first, for context, I added these selectable rules to my Styles dropdown via the Custom style formats CSS (discussed in the previous section):
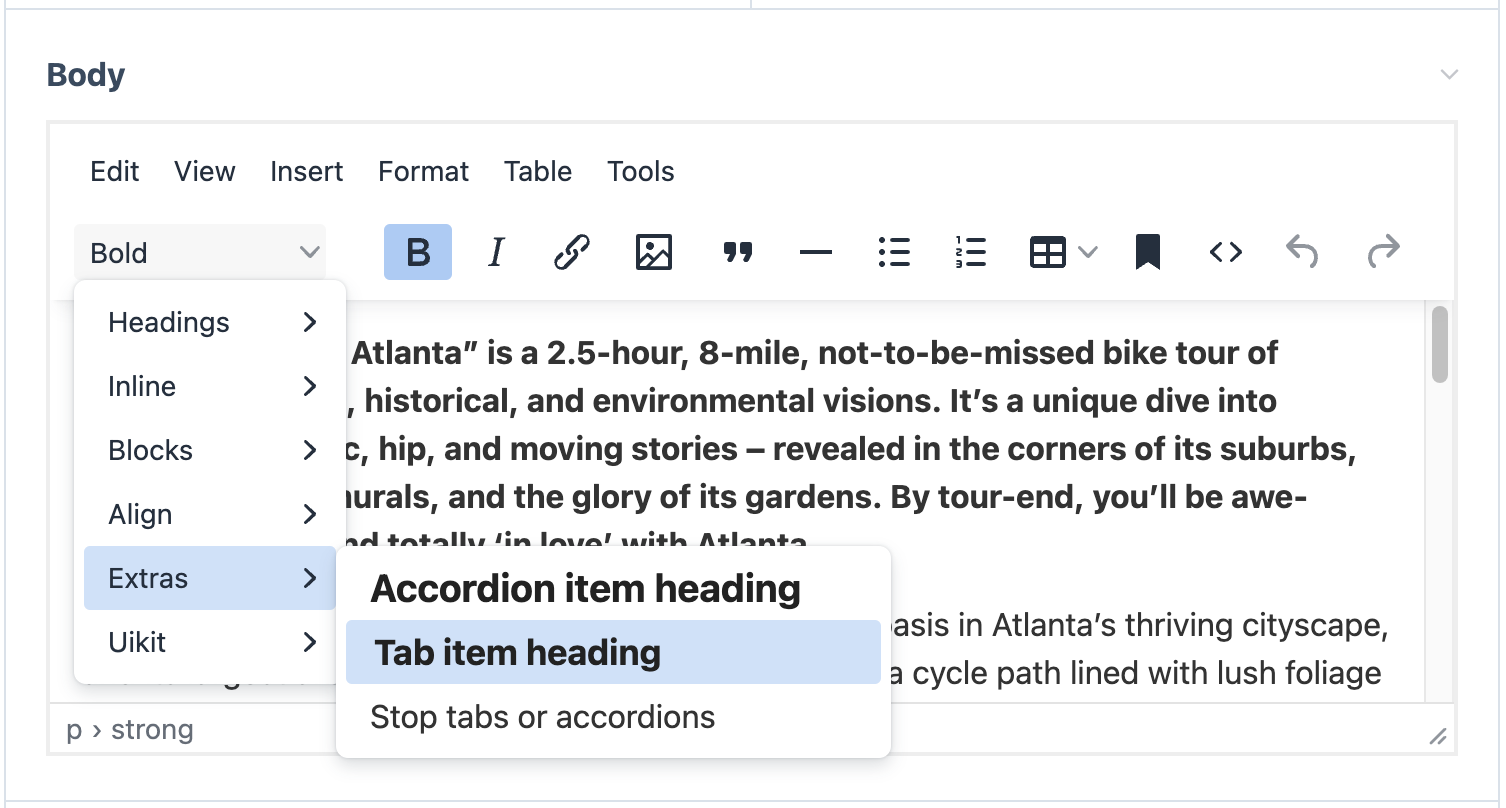
#Extras h6.accordion { } /* Accordion item heading */
#Extras h6.tab { } /* Tab item heading */
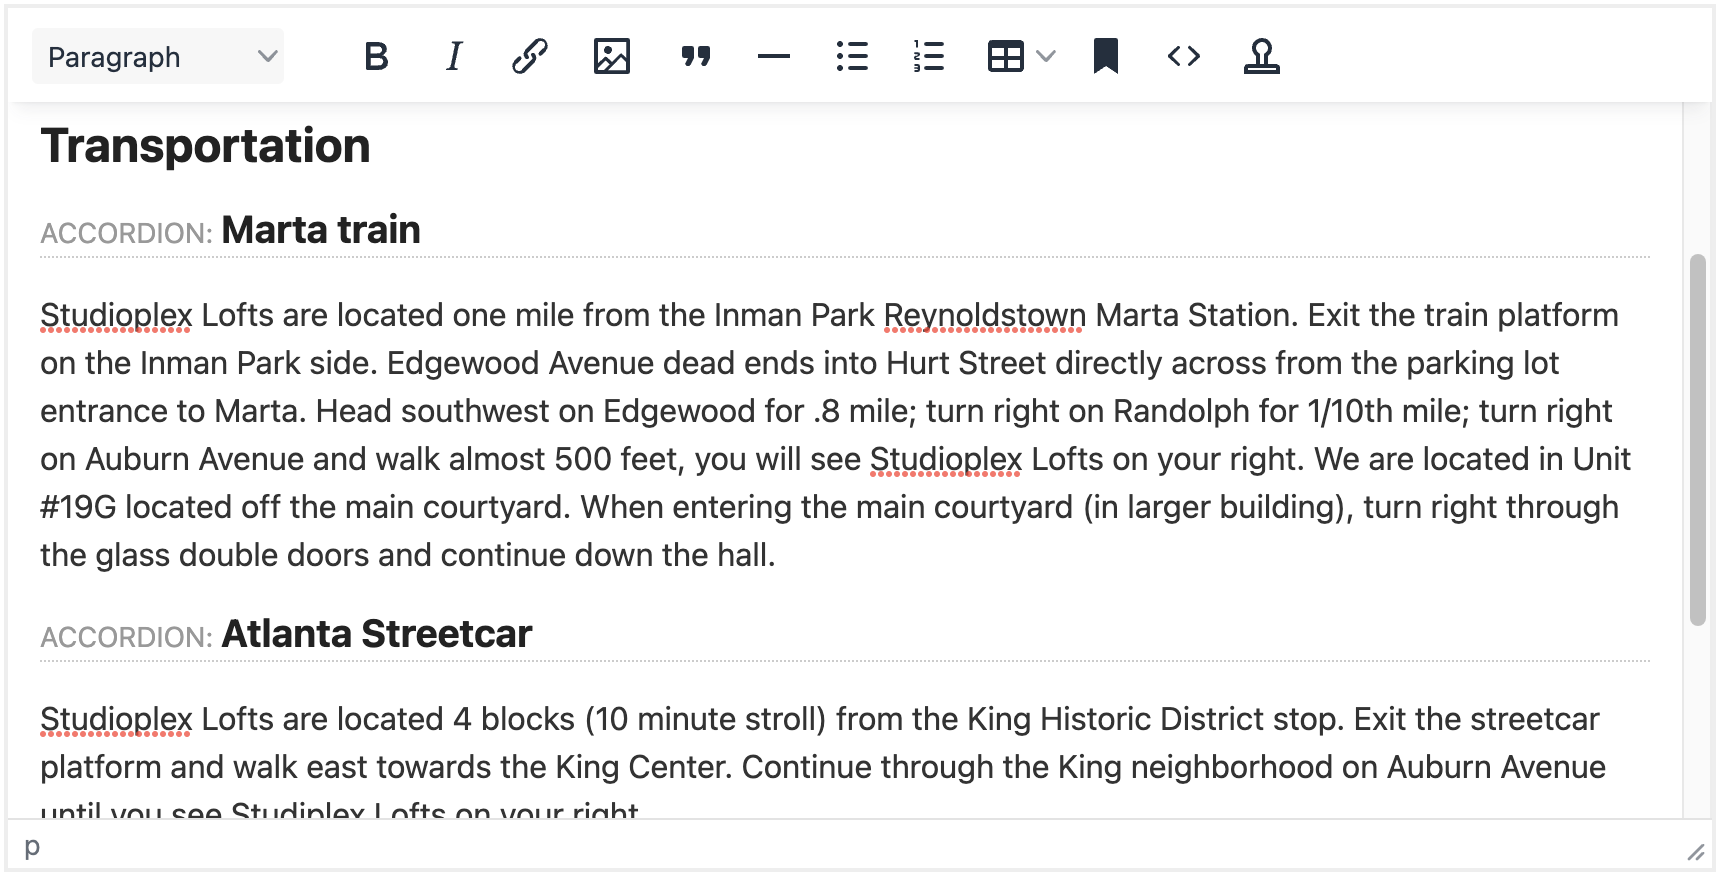
#Extras hr.stop { } /* Stop tabs or accordions */These are elements the front-end of my site recognizes and converts to Uikit Tabs or Accordions. In the editor, I wanted to visually identify the elements not just like headlines, but with borders and labels, so that it was clear to the person editing what they were. To do that, I needed to use CSS beyond what I could specify in the Custom style formats above. So I specified the editor styles for these elements in the Extra CSS styles setting instead:
h6.tab, h6.accordion { border-bottom:1px dotted #ccc }
h6.tab::before { content:"TAB: "; color:#999; font-size:14px }
h6.accordion::before { content:"ACCORDION: "; color:#999; font-size: 14px }
hr.stop { border-color:#ccc; }
hr.stop::before { content:"STOP TABS/ACCORDION"; color:#999; font-size:14px }
This is just one example, and I'm not sure it's the best one, but it's a real life case that I'm using now. The point is, you can easily add any additional CSS to your TinyMCE editors, without having to manipulate the Styles dropdown, and without having to modify or replace the TinyMCE content.css files.
Another example… If you just wanted to do something simple like make h2 headlines display in red, then you would just add this:
h2 { color: red }This is something we recently added to InputfieldCKEditor and we found it so useful that it made it into the first version of InputfieldTinyMCE as well.
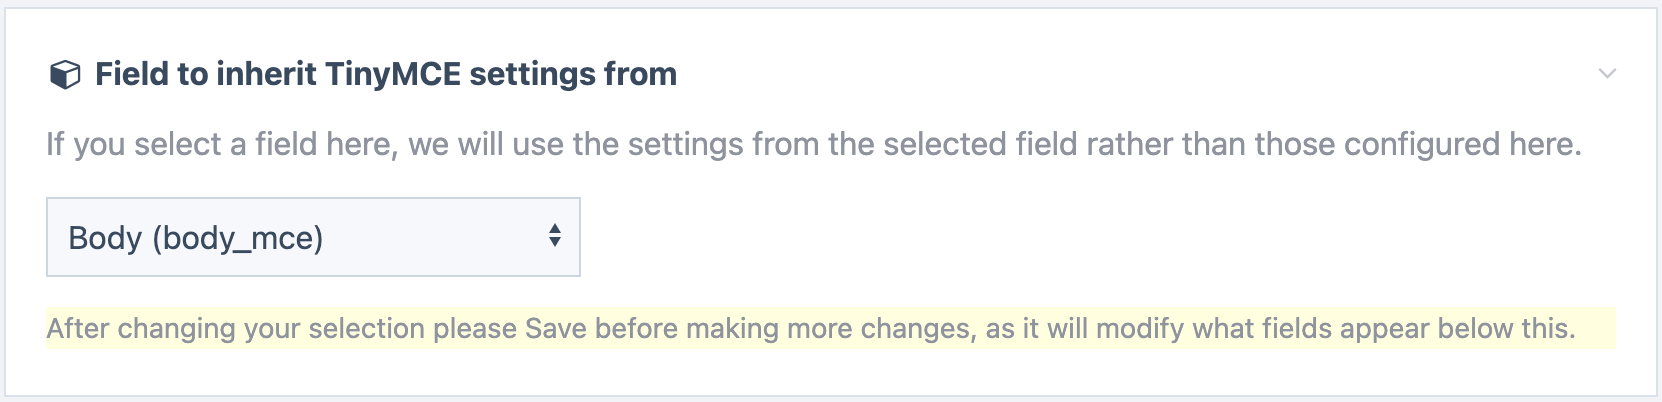
For any rich text editor, there's a lot to configure, at least relative to other types of fields. Being able to simply inherit the settings from an already-configured field can be a big time saver. Plus, users appreciate consistency in their editing experience.
Perhaps you have 10 different fields using TinyMCE, but have the same needs with all of them, you can just configure 1 of them and set the rest to inherit those settings:
When you need to add or change something, you only need to edit 1 field, rather than on all of them.
I find this particularly handy with Combo fields, where I tend to have a lot of different rich text editor fields, all with the same configuration needs. I can set them all to inherit from the same field. I might even create a new Textarea field using TinyMCE just for that purpose (assuming I don't already have the configuration I need in an existing field).
At least one Fieldtype (ProFields Table) actually requires you to inherit settings from an existing field, since the scope of TinyMCE configuration goes beyond what can easily be configured in a Table field column.
Inline image resizing is the ability to resize images within the editor (not modal dialog) by dragging the corners of the image.
 This is a feature that ProcessWire 2.0 launched with—you'll even see it in the original 1970s ProcessWire intro video at this timestamp. But we sadly lost this feature in PW 2.5 when switching to CKEditor, since it was not supported (and still isn't, as far as I know).
Not only does it resize the image, but it also makes ProcessWire generate a new size variation of the image (from the original non-sized source file), and updates the editor to use that new size variation in the src attribute of the <img> tag.
Without this feature, you have to double click an image to open ProcessWire's image editor, resize it in the modal/popup dialog box, then click Insert to update it in the editor. Same result, just more steps.
This is an optional feature that you can disable by unchecking the Resize checkbox in the Features part of the TinyMCE field configuration. But I find it pretty handy and like to keep it enabled.
One reason you might decide to disable it is if you are concerned about unnecessary image size variations getting saved on the file system, as this function creates a new one on every drag/resize. So if disk space is a concern, and you think the client may resize images over and over by the dozen, on a regular basis, you may choose to disable it.
One of the challenges with rich text editors is how to handle content that's been copied from elsewhere (like Word) and pasted into the rich text editor. Such content often has loads of irrelevant elements, attributes and classes, like a flare up of div-itis and a bad case of span-arrhea.
Some of that markup mess often ends up in the content pasted into the editor. While much of it may get cleaned up by the editor's content filter and/or HTMLPurifier, some of the messy markup can persist and cause issues now, or later. It's one of the reasons why some rich text editors even convert markup into a different (non-markup) format, behind the scenes.
Markup can be clean and semantic, but it can also be a styled mess. And most of the time the styled mess comes from content copied elsewhere and pasted into the editor. We are here for the clean semantic markup, not the mess. So how do provide a firewall against messy markup and bad copy/paste habits? Thankfully TinyMCE has good content filtering options, and InputfieldTinyMCE uses HTML Purifier. But even that often isn't enough (in TinyMCE or CKEditor). This is where the Pastefilter feature comes into play, a custom ProcessWire addition to TinyMCE.
When the Pastefilter feature is enabled, ProcessWire will process the pasted markup with a set of whitelist rules before inserting it into the editor.
These whitelist rules apply only to content copied from outside of the editor. So if you are copying one section of content in the editor and pasting it into another, Pastefilter will skip over that. It assumes content already in the editor is not something you want it manipulating further. This enables you to use more restrictive rules for externally pasted content, while leaving TinyMCE-originated content alone. It makes sense to be more selective about what markup we'll accept from external sources than from internal sources.
The default Pastefilter whitelist rules are a good starting point, or ending point. So don't feel the need to modify them unless there's some specific conversion you want to add or modify. The rules are defined in the InputfieldTinyMCE module settings.
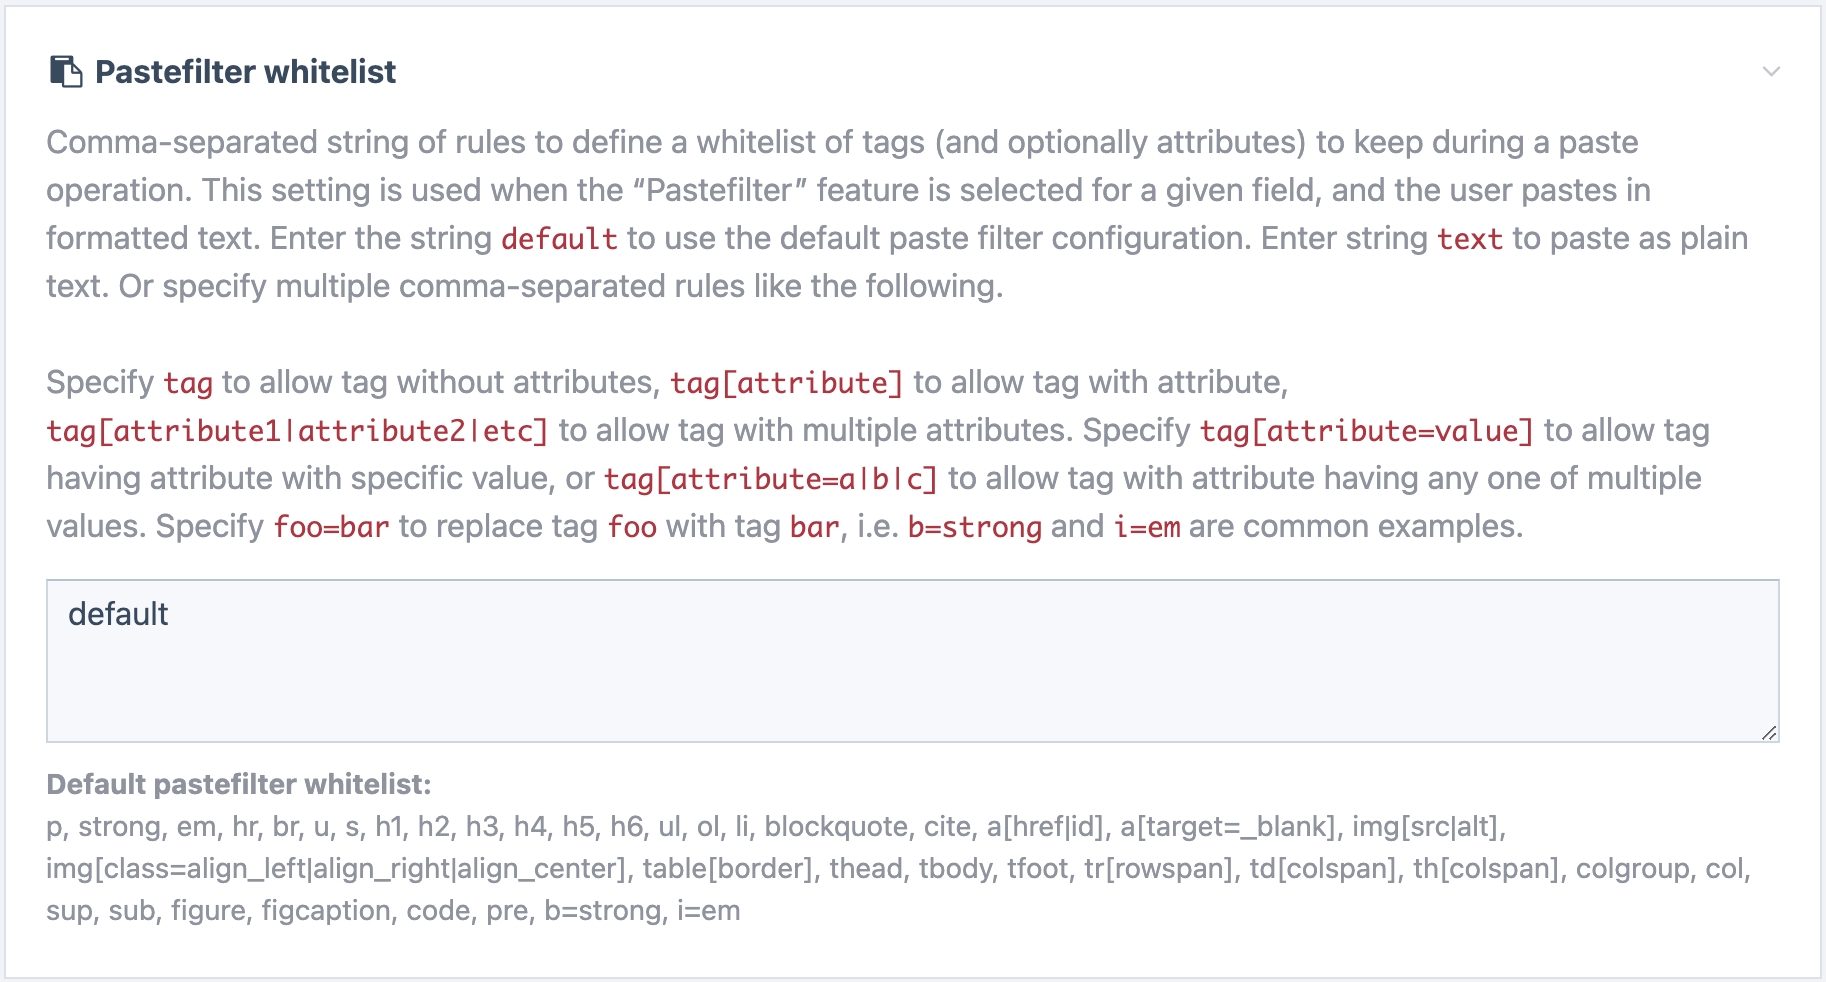
Let's walk through these default Pastefilter whitelist rules, which help to describe the conversion that it performs. Here is the default Pastefilter whitelist:
p, strong, em, hr, br, u, s, h1, h2, h3, h4, h5, h6, ul, ol, li, blockquote, cite, a[href|id], a[target=_blank], img[src|alt], img[class=align_left|align_right|align_center], table[border], thead, tbody, tfoot, tr[rowspan], td[colspan], th[colspan], colgroup, col, sup, sub, figure, figcaption, code, pre, b=strong, i=em
What we have above is a comma-separated list of HTML tags that we allow in pasted content. Keep in mind the Pastefilter rules are intentionally much more strict than the editor's content filtering rules, as we are trying to reduce pasted content to markup that is as un-styled as possible, while remaining semantic.
In cases where we allow just the element without any attributes, we just list the tag name, i.e. p or strong or h2, etc.
In cases where we allow the element with specific attributes, we specify one or more pipe-separate attributes in square brackets. For instance, a[href|id] means that we allow the "a" element with "href" or "id" attributes having any value. In our case, we also allow "a" elements with a "target" attribute having the value "_blank", which is specified by: a[target=_blank]. If the element has some attribute that is not allowed, or some attribute value that is not allowed, then the attribute is removed.
In the case of img tags we allow images to have a src or alt attribute img[src|alt], but we also allow images with a "class" attribute, so long as it has the value "align_left", "align_right" or "align_center". This is specified with the rule img[class=align_left|align_right|align_center]
We can also apply replacement rules, replacing one tag with another. For instance, the rule b=strong replaces any <b> elements with <strong> elements, and the rule i=em replaces any <i> elements with <em> elements.
The Pastefilter whitelist doesn't actually remove any text, it only removes (or replaces) tags. If the pasted content contains a tag that isn't allowed, then the tag is simply removed from the markup, leaving the text in place. This is where TinyMCE's content filter picks up, bundling such content back into a <p>.
I recommend keeping the Pastefilter enabled, as it can prevent the external copy/paste mess before it starts. But there may be cases where you want to revert to TinyMCE's default handling of copied/pasted content. In those cases you can simply disable the Pastefilter for the relevant field(s).
Why do many InputfieldTinyMCE settings have the literal text “default” in the <input> rather than the actual default value? Because it enables us to change what the default value is over time, as the module evolves. If it used the actual default value in the input, then the value would be essentially locked in, unable to evolve further, for those that want to continue using our recommended default values.
TinyMCE comes with a lot of candy, but take care not to eat too much! There are a plethora of toolbar/menubar and plugin options available. TinyMCE only loads those that you enable, and every one that you add increases the potential editor overhead and load time. Because of this, I would avoid the "enable everything" case and instead choose your tools/plugins wisely, according to your needs.
For instance, I found a noticeable performance improvement by not using the "advlist" (advanced list) plugin. This plugin enables different options for bullets and/or numerals when inserting <ul> or <ol> lists. While it was cool to be able to select different bullet/numeral types for lists, that's not actually something I need or want my clients doing... I prefer that to be defined in the stylesheet.
Just remember that the fewer tools and plugins you enable for your editor, the better it will perform. The default selection for the toolbar and plugins provide a good balance of features and performance. But if there are any you don't need (like the Table tool/plugin for example) you can disable it in the field settings by removing it from the Toolbar and/or Plugins.
One plugin/tool I suggest keeping always enabled is the code plugin. This is what provides the pop-up dialog HTML editor. Disabling that is kind of like having a car with no hood (no access to the engine). Like with CKEditor, it's a good last resort to have in case you get stuck with some unusual whitespace or indents that you can't seem to clear. Sometimes the quickest way to resolving something is to go straight into the markup. Though if you are using the editor in Normal mode, the path selection in the status bar is another handy tool to clear the way.
There are far more setting options available in TinyMCE than I could make interactively configurable with the module or field. So when you configure a TinyMCE field in ProcessWire, you are just seeing a small selection of the settings available, a curated list of those that I thought would have the broadest use and appeal.
You aren't limited to just the settings that we've made interactively configurable. Look at all the settings available for content filtering or all the settings available for behaviors or user formatting, as examples. And most plugins add their own additional settings, such as the settings available for the table plugin. This just scratches the surface, there are a LOT of configuration settings available.
Chances are, most won't ever need to delve into this depth of settings. But when or if you do, we've got you covered with the ability to specify settings with a custom JSON file or JSON text input. Your custom JSON settings get merged on top of the settings that InputfieldTinyMCE uses to initialize TinyMCE, so your settings will override those provided by the module defaults or configured interactively.
The custom JSON settings can be added on the module configuration screen, but they can also be added with each field. So when using custom settings, you'd use the module configuration for custom settings that you want to apply to all TinyMCE instances, and you'd use field configuration for those you want to apply to just the field being edited.
{ "style_formats_autohide": true }Above is a very simple example of custom JSON. It enables the style_formats_autohide setting. What this does it makes options in the Styles dropdown stop appearing when they don't apply to the selected element. Without this option, they still appear but are disabled/greyed out. (I'm not sure anyone actually cares whether it hides or disables, but you've got to hand it to the folks at TinyMCE, they left nothing uncovered, everything is configurable.)
I've found there are times where you may want to add to an existing setting rather than completely redefine it. This is especially the case for settings that are already interactively configurable in InputfieldTinyMCE, where you'd like to add to the existing configured value rather than replace it. For this reason, InputfieldTinyMCE looks for the add_ prefix on any settings, and appends them to an existing setting value. For instance, if you wanted to add "undo" and "redo" tools to the toolbar, rather than completely redefining it, you could use add_toolbar:
{ "add_toolbar": "undo redo" }Now when you use the editor, you'll see the toolbar you configured interactively, but you'll also see the Undo and Redo tools added to the toolbar as well.
What if you had that add_toolbar custom JSON defined in both the module and field? For instance { "add_toolbar": "undo" } in the module custom JSON and { "add_toolbar": "redo" } in the field custom JSON? In that case they would merge together, so that the end result would include both "undo" AND "redo", ensuring both tools are added to the toolbar.
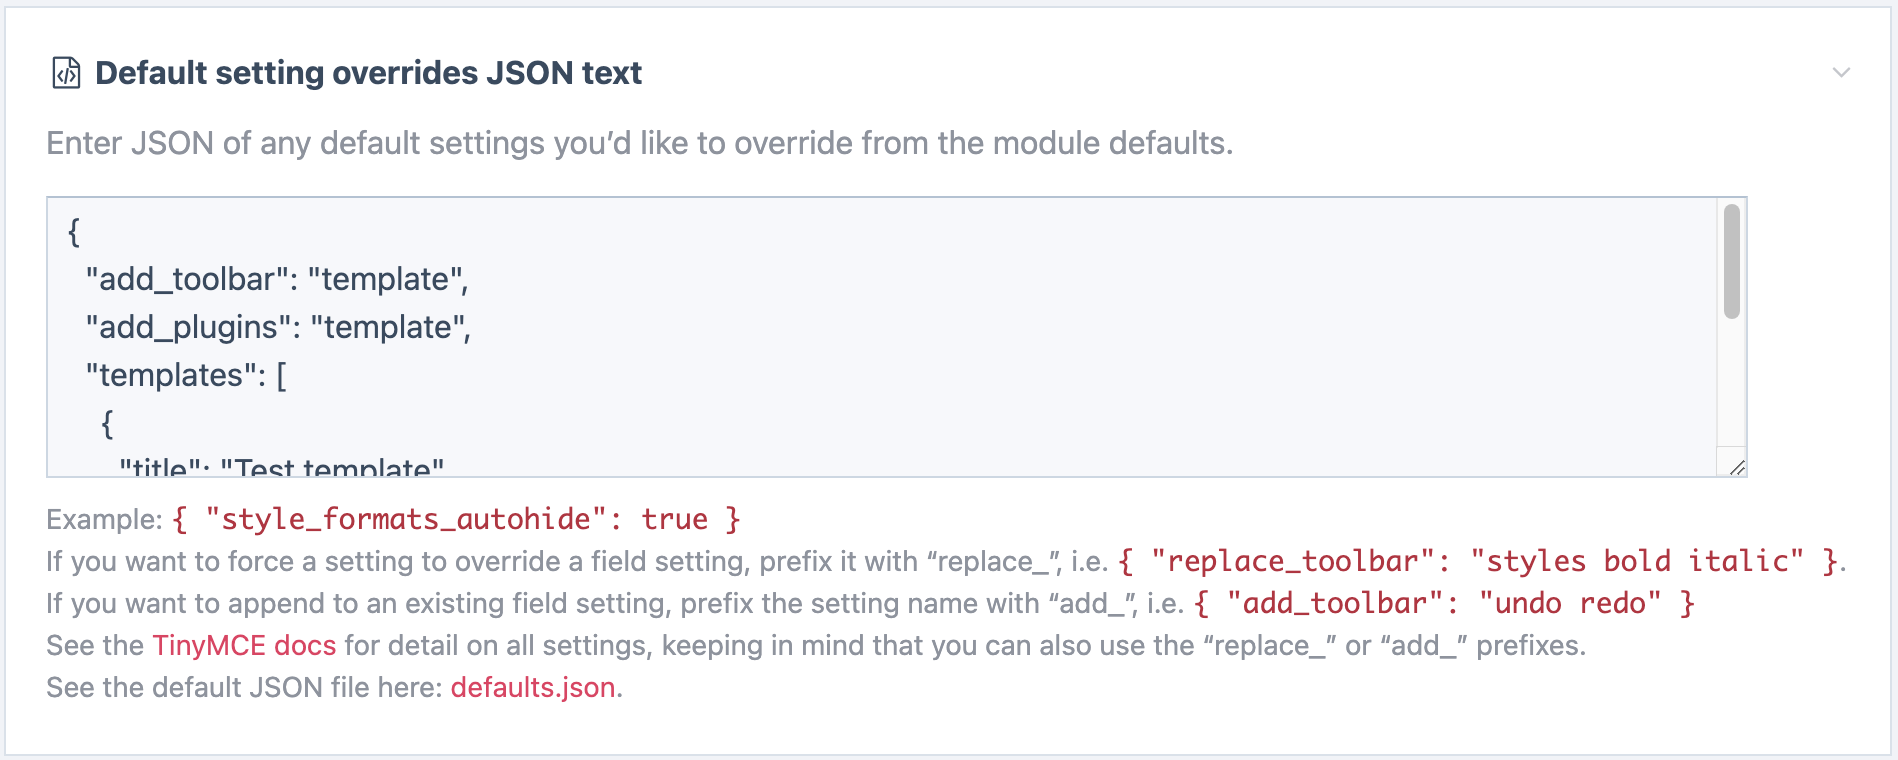
Here's another example that comes by way of Szabesz and adds the Template plugin, toolbar, and a simple template to demonstrate:
{
"add_toolbar": "template",
"add_plugins": "template",
"templates": [
{
"title": "Test template",
"description": "Adds a test paragraph.",
"content": "<p>This is a test paragraph.</p>"
}
]
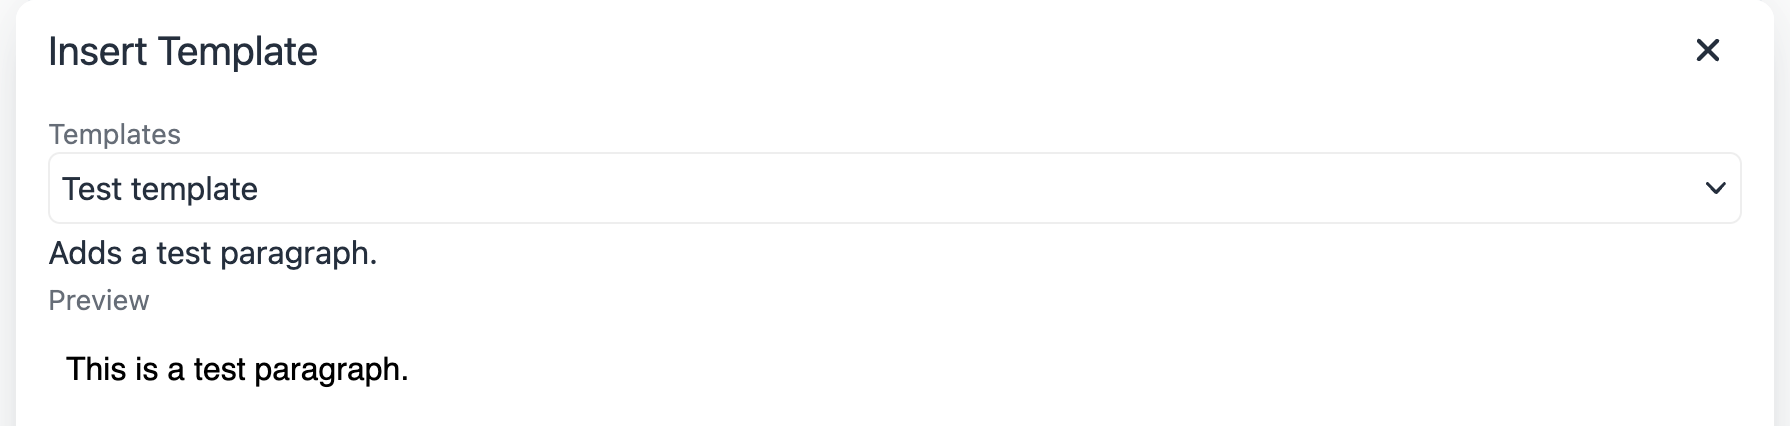
}The custom JSON above enables the Template plugin, adds a Template tool to the toolbar, and adds a single “Test template” that you can select to automatically insert into TinyMCE. This is just a simple example, but imagine the possibilities.

InputfieldTinyMCE starts with its defaults.json file. These are basically the settings that I thought were the best starting point for most. They continue to be changed and optimized with each version of InputfieldTinyMCE and that'll likely continue as the module evolves.
Any settings that you configure with the InputfieldTinyMCE module configuration screen (whether interactive or custom JSON) will merge with and override those in the defaults.json file.
Next, your settings for any given TinyMCE field (whether interactive or JSON) merge on top of those from defaults.json and module configured settings.
To summarize, the settings are a combination of defaults, module settings, and field settings, merged in that order. So module and field settings can both override defaults, and field settings can override module settings.
This post has largely been focused on configuration that is unique to ProcessWire's implementation of TinyMCE. But there's plenty more to cover! This post is already pretty long, so we'll save those topics for later. In one or more follow up posts, I'd like to get into more related topics, such as how to develop a plugin to use with InputfieldTinyMCE. I'd also like to delve into some useful plugins and how to add and configure them (like the Code sample plugin, for example). These are just ideas, what would you like to see? Thanks for reading! Stay up to date and enjoy reading more at ProcessWire Weekly.
This week we take a look at a new rich text editor for ProcessWire, why we chose it, some highlights, screenshots, and why we think you’ll like it. More
140 commits, 55 resolved issues, dozens of new features, eight contributors, and five new pull requests make yet another great new version of ProcessWire. More
“Yesterday I sent the client a short documentation for their ProcessWire-powered website. Today all features already used with no questions. #cmsdoneright” —Marc Hinse, Web designer/developer
HMCB
- 1 year ago
- 91
★★★★★Wow. Just wow. Amazing work Ryan.
Reply